


Empennage - Horizontal Stabilizer
The Horizontal Stabilizer is starting to take shape, but first, a short description of deburring.
Deburring is very simple, but it seems to take a significant amount of time. The deburring tool is a handle with a bent rod that rotates inside the handle. The rod has a sharpened section in the center that is the blade. The tool cuts metal when it is pulled along the edge of a piece of metal. Sometimes you use the tool just like a paring knife to smooth the inside edges of a corner piece.
When I ordered my tools, there were a lot of different deburring tools, but I could not find one that fit Van's description, so I bought what looked like a useful tool. It had a big handle with a finger guard, and a long curved rod with a "V" grove at the end of the rod. When I tried it out, it beveled both sides of the edge of a piece of aluminum, but it was hard to use without also cutting a grove about 1/8" from the edge of the piece of metal. I'm sure the tool can be used, but I am glad I only tried it on a piece of scrap metal that Van supplies.
The tools that I am currently using came as a 4-tool kit from Home Depot. This time, I wanted to look at the tool before I bought it. I had a hard time finding anyone that carried any deburring tools, but I finally found this set at Home Depot.
The Home Depot kit has 4 tools with different size blades that are supposed to be for aluminun, steel, brass, and plastic. I really don't see any difference between the blades other than size. The aluminum blade is the smallest, and is the only one that will fit inside a #40 hole.
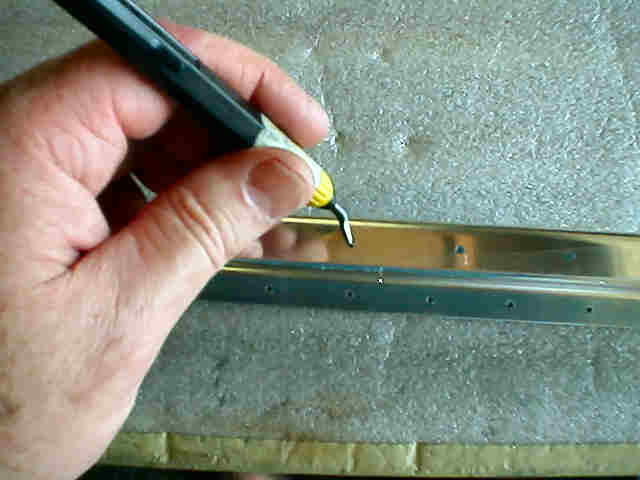
 | Here, the tool is pulled along the edge of the rear spar, and it cuts a thin sliver out of the edge of the spar. You may notice that this is a bogus picture, since I am right-handed, and there is no way that I could pull this tool with my left hand. I'm so right handed, that I cannot take the picture with my left hand. Note, I discovered that I should actually file the edge first, since there are little nubs that stick up. This causes the deburring tool to skip and you get a lot of little cuts with the nubs never quite disappearing. A file takes these right out, and then the deburring goes real quick. |
 | Here, the tool is used to remove the ridge of metal inside the hole after drilling. Yes, every hole needs to be deburred, both inside and outside. Yes, this is another bogus picture. |
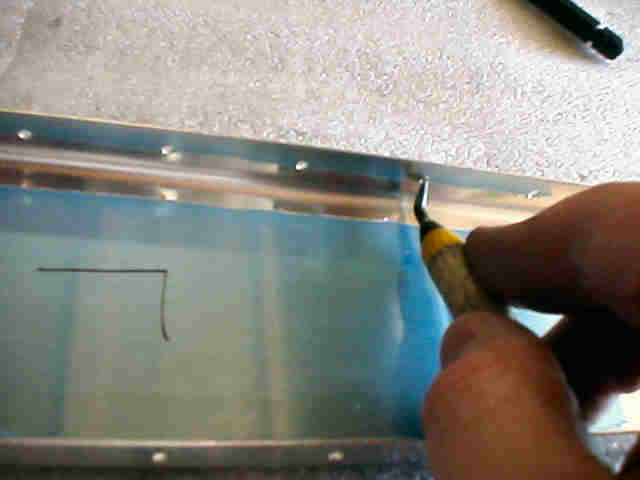 | Ok, I figured out how to take pictures with my left hand. This is the inside of a hole on the front spar. You just spin the tool a few times, and the hole is nice and smooth. Not too much, you do not want to make the hole any bigger. After about an hour of this, I get a big pain in the right side of my chest that lasts for a few days. I might have to try the countersink in the electric screw driver idea. |
 | Anyway, after all the deburring, I got to set some more rivets in the front spar and the HS-404/405 center ribs. Riveting did not go so good today. I had a hard time getting the gun and the bucking bars into the right positions, and I screwed-up a few rivets. Two I drilled-out and fixed, but one is in a really bad spot to remove, but I think it will do. |