Before trying to fabricate a real part, I thought it might be prudent to
make a few practice parts first. In the past, all of my fiberglass work
consisted of laying cloth on some sort of form, and filling it with Epoxy
or Polyester resin, then doing a few more layers. I wanted to give the
"plug and mold" process a try. This is where you make a plug from a
replica of the part that you want to fabricate, then you make a mold from
the plug, then you use the mold to make a layup of the final part.
There are a few good reasons to go the "plug and mold" route. First, if
you want to make more than one part, this is almost required. Once the
mold is complete, it is possible to turn out exact duplicates pretty
easily. Second, with a good mold, the outside surface can be almost
flawless, without a lot of sanding.
One reason not to do the "plug and mold" process is because it requires
you to make the part three times. Also, for some parts it may not be
feasible to do the layups inside a mode, like a deep and narrow part.
For practice I made a couple of parts that have no purpose other than
to test some ideas and to develop some skills working with fiberglass.
I made a large plug, and a couple of small parts. The large plug was
simply a rectangle of foam with large rounded edges on one side. The
small parts were simple foam parts shaped like bread pans so they would
release from the fiberglass easily.
 |
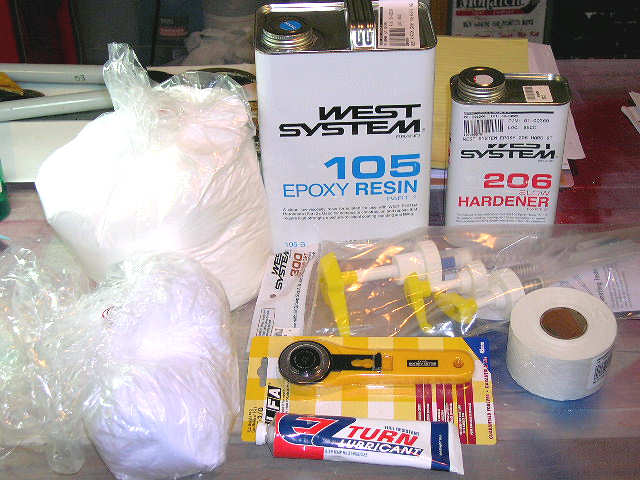
First step was to order the materials. I ordered everything on
the list from
Jim Andrew's fiberglass tutorial. He has all of the part
numbers for an order from
Aircraft Spruce.
Here's what $200 will get you for fiberglass. Well, I still have 5
yards of cloth coming, and you don't really need the EazyTurn to do
fiberglass work, but I did need the EzTurn for my fuel system. Note,
that I ordered a whole gallon of the West Systems Epoxy. This would
be a lot less if all you needed was a quart.
|
 |
For the parts, I used pieces of the 3/4" foam sheet that were left over
from insulating my garage door with a few months ago. I glued these
together using 3M 377 spray contact cement. BTW, if I was smart, I
would have removed the foil from the foam before gluing the pieces
together.
|
 |
After making the part square. Notice the paper between the pieces
of foam. This was a big mistake.
|
 |
Rounded.
|
 |
Three test pieces. The large piece will be coated in epoxy to make a plug.
The small pieces will be used as a form to make direct layups. I think I
have one coat of epoxy on all three pieces here.
|
 |
I am not going to make a proper form out of the small pieces. I thought I
would experiment with using waxed paper and Saran Wrap instead of mold
release.
|
 |
First layer of glass on the small parts, and another coat of epoxy on the
large plug. I had a hard time with the corners of the small parts, so they
only have fiberglass on the sides.
|
 |
A week later, ready to try and pop the foam out of the small pieces.
|
 |
Saran wrapped part came right out. Partly because there are no corners on
this part, so it was easy to pry the fiberglass off. The missing corners
will turn out to be hard to correct (in fact, the part never did get finished
100%).
|
 |
Looks like I pushed the waxed papered part around when I was laying on the
fiberglass, and the epoxy got underneath the part, which makes it hard to
pop out the foam piece.
|
 |
I broke the foam trying to separate it from the fiberglass. However, this
part did get glass in the corners, so it
|
 |
One more layer of glass, at least in the corners.
|
 |
Ok, now the fun begins. We have enough glass on the part that we need to
start sanding of the excess epoxy, and trying to clean-up the shape of the
parts. This is the smaller part that had almost full corners on the first
layup. Almost looks like a butter dish top.
|
 |
This part is a mess. It has become lopsided, the corners are still not fully
covered, and it has voids in the fiberglass. If this was for real, I might
have just thrown this away and started over. But, this is for practice, so
let's see if we can salvage it. That's the thing about fiberglass, with
enough work, almost any part can be fixed.
|
 |
Hey. these almost look finished, or so I thought.
|
 |
Having a hard time filling this hole in the large plug piece. The
epoxy just runs down the side. Maybe some SuperFil would work here.
|
 |
Trying to make this part right, I have sanded through the fiberglass.
This needs to be filled.
|
 |
I have decided to turn these two parts into molds, so I need to do
some work on the inside. This will turn out to be a lot of work.
|
 |
This is where I figured out I need to try to stiffen up the epoxy,
which tends to just run off of the part. So, I got out the micro
glass beads and added some to the epoxy before covering the parts.
Use the perscription bottle to distribute the glass beads. You do
not want to open that big bag too often.
|
 |
One pump of epoxy without the glass beads.
|
 |
Add some glass beads. Not sure how thick I want to make it, so
experiment.
|
 |
Topside.
|
 |
We'll see how that works out for the inside.
|
 |
I'm going to call this part done.
|
 |
Inside too.
|
 |
Lay on some primer. This is Rustoleum primer. Not sure how it is going
to work on fiberglass.
|
 |
Still sanding on the big plug and the other small part.
|
 |
I still have a large area here that is not filled.
|
 |
Slather on some more filler. For some reason, I decided that the first
small part was not finished enough inside to serve as a mold. You really
want the mold surface to be perfect. Obviously, it was not. At this
point I started working on the arm rest. But I did manage to finish up
the smaller mold and I did several coats of wax.
|
 |
I finally got around to trying to make a part using the smaller mold.
I used several coats of paste wax on the mold as a mold release. I was
too cheap to fork over the money for the spray-on mold release when I
ordered the fiberglass materials. This part was made using a medium
thick paste of glass beads and fiberglass with small pieces of fiberglass
pressed into the epoxy. This was really a test to see if the wax would
release the fiberglass. If I was doing this for real, I would have used
a better piece of glass for the layup, but it actually turned out pretty
good. The waxed part let go without too much difficulty, and the glass
beaded epoxy worked pretty good as a gel coat. I think I have the hang
of it. Maybe a little more practice, but I can manage.
|